
Google Ads allows any business owner to create an account and start advertising their products and services on the world’s biggest search engine. The chances are you’ll start generating valuable traffic from day one.
In this article, we’ll show you how to create your first ad in Google Ads. We will explain the pros and cons of creating campaigns manually compared to using automated features like Smart campaigns, where Google does most of the work for you.
Do I need to create my own ads in 2021?
Google’s advertising platform offers a low entry point for companies of all sizes to tap into the search engine’s enormous user base, paying for targeted traffic.
The thing is, Google Ads is a complex platform that takes a lot of time to get familiar with, let alone master. This has always been an adoption barrier, especially for smaller businesses that don’t have the time or resources to learn an entire advertising platform.
To help solve this problem, Google has rolled out a series of automated features in recent years, including Smart campaigns. These help new users run ads quickly without worrying about the technical setup.
There are downsides to this, though:
- You rely entirely on Google’s algorithms
- You surrender control over your campaigns
- Google doesn’t provide extensive reporting from automated campaigns, bids, etc
- You can’t learn from automated campaign performance, because of the lack of data
- Google’s priority is clicks
- Your priorities are likely to be profit, revenue, ROAS, conversion rates, etc
- You can’t fully test and optimise automated campaigns
While the automated features in Google Ads make it easier to get started on the platform, you’re sacrificing some performance potential for the sake of convenience. Now, this doesn’t mean you’re certain to achieve better performance than Google – that depends on you.
In truth, the performance of Google’s automated campaigns is pretty average.
This might be enough for you if you want to generate average results (which are still better than no results, of course), without investing time and other resources into the manual management of optimising campaigns.
There’s no right or wrong answer here. It all comes down to measuring up the pros and cons against your priorities. Google’s automated features are a welcome addition because they open the platform to more businesses – especially smaller ones – but they have their limitations.
So, in the rest of this article, we show you how to create your first ad, from scratch, in Google Ads.
Creating your first ad in Google Ads
In this guide, we’re going to show you how to create your first search ad in Google Ads and, just to make sure you know exactly what we’re talking about, these are the regular ads that show above organic results when you type in something like ‘travel insurance’ into Google.
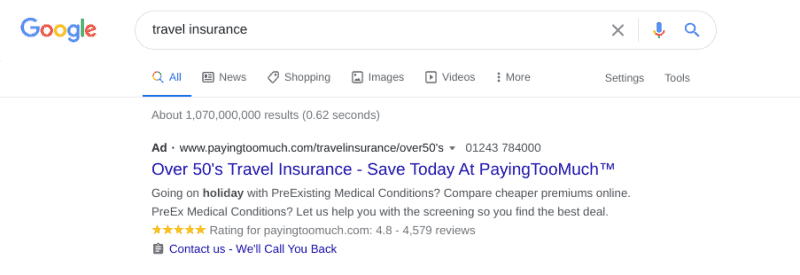
Before we get started, you’re going to need a Google account, and an activated Google Ads account linked to it. If you haven’t done so already, you can create your account by visiting the official Google Ads page, clicking the Start now button and following the instructions.
Once your account is live, log in to your account and follow the remaining steps in this article.
Step #1: Create a new campaign in Google Ads
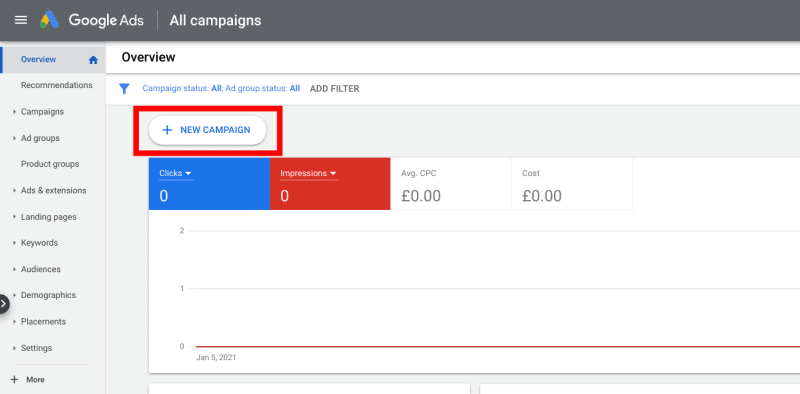
Before you create your first ad, you’re going to need to create a new campaign. From the main dashboard, click on the + NEW CAMPAIGN button to get started.
On the next screen, select your main campaign goal. You can choose one goal from the following eight options:
- Sales
- Leads
- Website traffic
- Product and brand consideration
- Brand awareness and reach
- App promotion
- Local store visits and promotions
- Create a campaign without a goal’s guidance
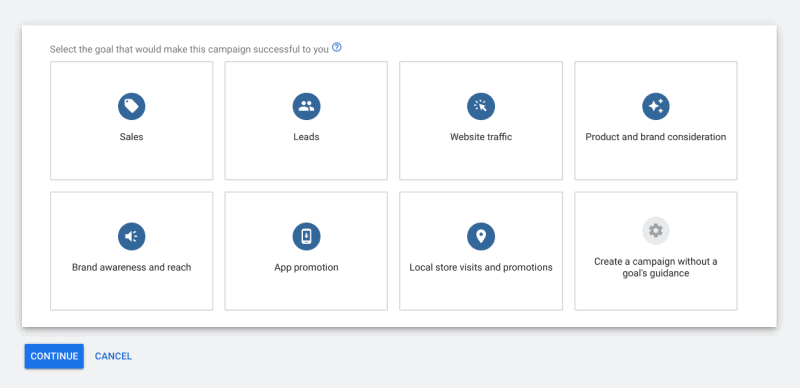
Choose the campaign goal that best reflects your aims. Do you just want to generate website traffic, or do you want that traffic to buy your product or convert into a lead?
The goal you choose here will affect the suggested settings Google proposes throughout the remaining campaign setup process. You don’t lose access to any features by selecting a campaign goal and, if you’re unsure what your goal is, you can select Create a campaign without a goal’s guidance.
For the sake of example, we’re going to select Leads. Once you’ve chosen your goal, click the Continue button.
Step #2: Select your campaign type
With Google Ads, you can run a variety of campaigns and the options available vary depending on the campaign goal you selected in Step #1.
Note: You can still change your campaign goal at this point to see which campaign options are available for each.
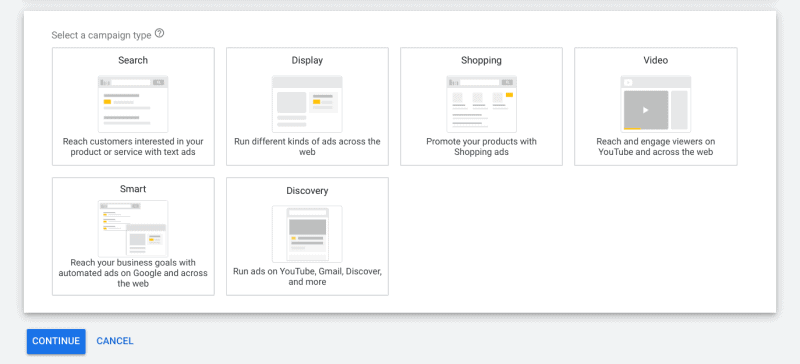
If you selected Sales or Leads as your campaign goals, you’ll see the following six campaign options available in the next section:
- Search
- Display
- Shopping
- Video
- Smart
- Discovery
We recommend creating a search campaign for your first ad, so we’re going to select Search from these options. Once you’ve chosen your campaign type, you must choose how you want to reach your campaign goal with five options to choose from:
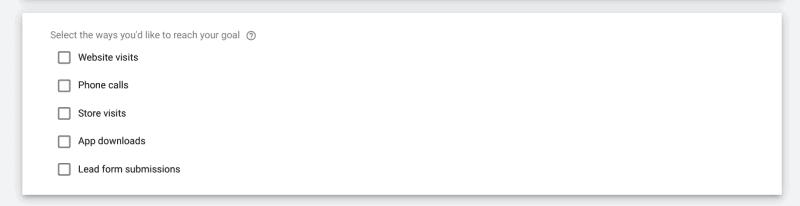
- Website visits
- Phone calls
- Store visits
- App downloads
- Lead form submissions
You can click multiple options from this list, depending on how you want to generate leads from this campaign. Most businesses will want to select Website visits and Lead form submissions, but you may also want to select Phone calls and Store visits to generate offline leads from your ad, too.
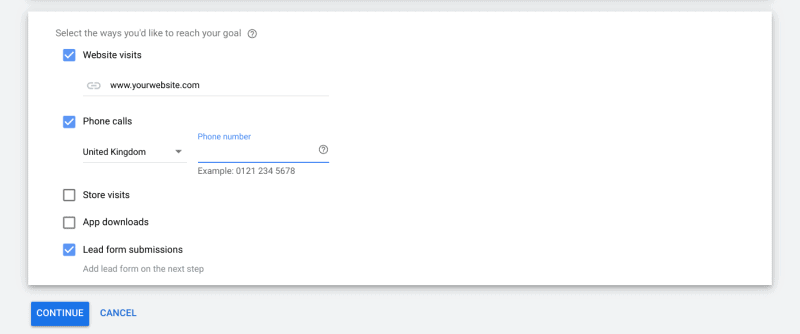
Once you’ve made your selections, you’ll provide some relevant information, such as the URL of your website and the phone number you want users to call. You’ll add the details for Store visits and Lead form submissions at the next step.
Step #3: Select your campaign settings
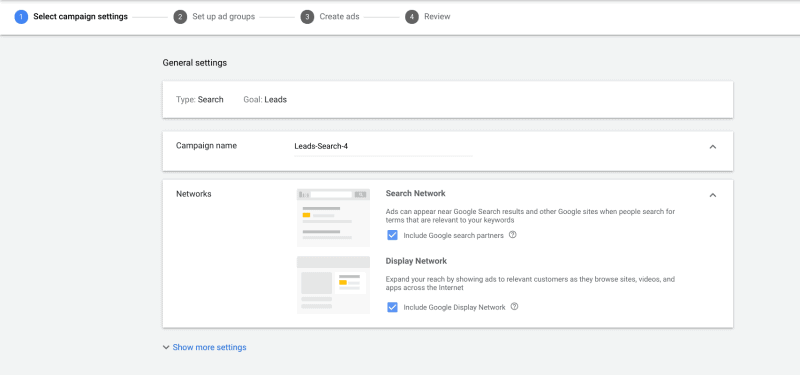
On the next page, you’ll select your campaign settings and in the General settings section, you’ll see the type of campaign and the campaign goal you selected earlier. You can still change the name of your campaign at this point.
In the Networks tab, you’ll see two check boxes – one for Search Network and another for Display Network. This is where you choose which of the networks you want your ads to appear on. Both boxes are checked by default, but you want to choose one or the other here.
We’re going to deselect Display Network so that our ad only shows on the Search Network.
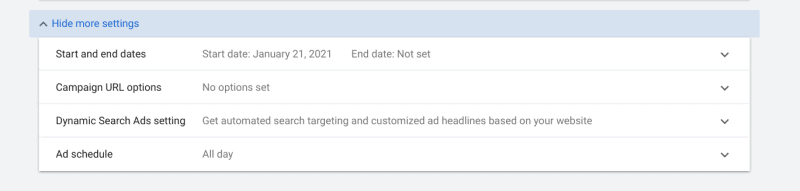
If you click on the Show more settings link under the Networks tab, you can also set start and end dates for your campaign, campaign URL options (for tracking), Dynamic Search Ads (DSAs), and ad scheduling.
We’re going to skip past these for now, but it’s worth getting to know these settings later.
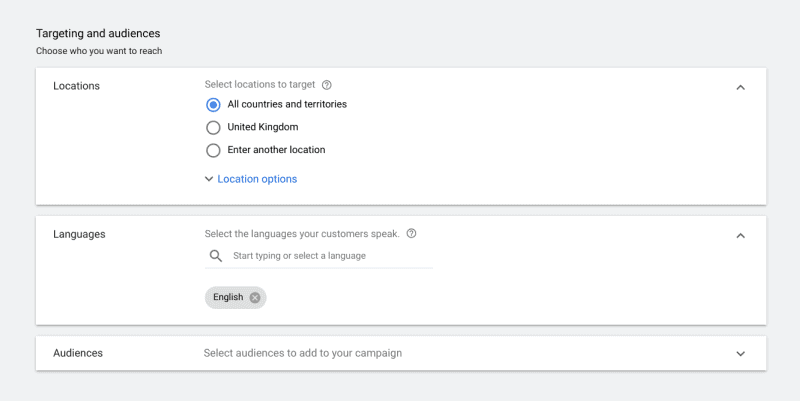
The next section you’ll find is Targeting and audiences, where you can select your settings for Locations, Languages and Audiences.
Locations, languages & audience settings
By default, your campaign shows in All countries and territories. Change this by clicking on the Locations tab to expand your settings options.
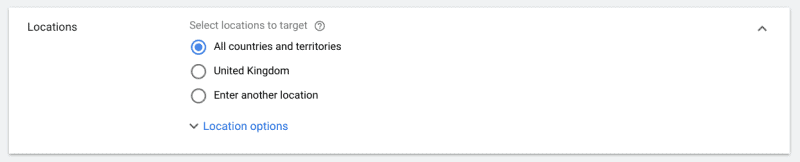
With the default All countries and territories settings, your ads are eligible to show in locations around the world. This isn’t ideal unless your business somehow operates in, or delivers to, every corner of the planet.
Pick the United Kingdom to only show your ads to people in the UK. Select Enter another location to choose which other countries, cities and regions the ads in your campaign can appear.
This is important if you only want your ads to show in specific parts of the UK or other countries where your business operates. You can also select locations where you don’t want your ads to show by using the Exclude option next to your chosen location.
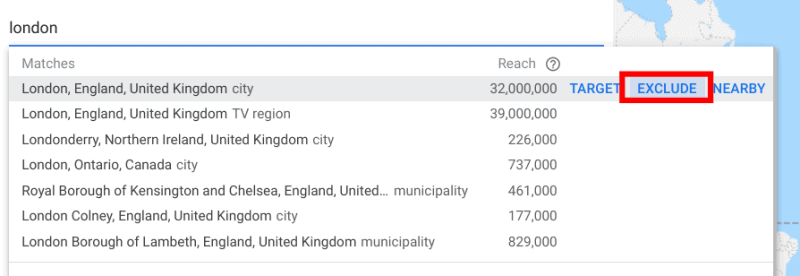
Once you’ve selected your target locations, you can click on Location options to choose how Google targets these locations for you.
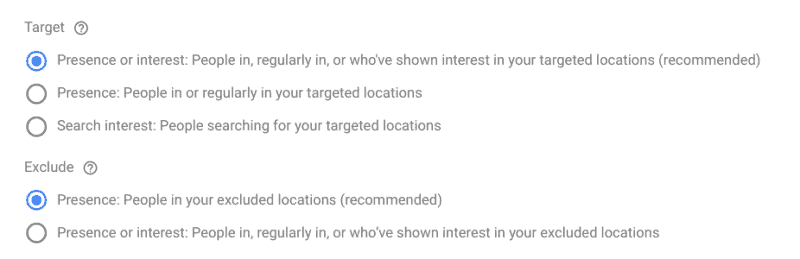
First, you want to select your Target and there are three options to choose from:
- Presence or interest: People in, regularly in, or who’ve shown interest in your targeted locations.
- Presence: People in or regularly in your targeted locations.
- Search interest: People searching for your targeted locations.
Google recommends the default setting of Presence or interest but don’t let this sway you. For most businesses, interest in an area isn’t an indication of purchase intent. There are exceptions, such as travel, but Presence is the correct option here for most.
You can also choose whether Google excludes locations by Presence or Presence or interest.
Languages is self-explanatory. English is the default, but you can add other languages if you plan to create separate ad groups for different audiences within the same campaign.
Click in the Audiences tab and you can select from recommended target audiences, create your own, or browse through all the audience targeting options available on Google Ads. We won’t go into too much detail here, but you can control who sees your ads, based on the following criteria:
- Detailed demographics: Parental status, marital status, education, homeownership status, employment.
- Affinity (interests & habits): Banking & Finance, Beauty & Wellness, Food & Dating, Home & Garden, Lifestyle & Hobbies, Media & Entertainment, News & Politics, Shoppers, Sports & Fitness, Technology, Travel and Vehicles & Transportation.
- In-market (research & planning): A large selection of targeting options based on specific products, topics, or interests where users show a string purchase intent.
- Remarketing & similar audiences: Targeting options for users who have visited your website and audiences showing similar interests or behaviours.
- Combined audiences: This allows you to combine audience targeting options to narrow down on specific audience types.
You can also choose whether Google only shows your ads to audiences that fit these targeting options by selecting Targeting. Or, you can stick with the default setting Observation which allows you to adjust bids based on your targeting options.
Google’s recommendation is the best option for most campaigns. Sometimes, though, you might want to create new campaigns to target niche audiences and select Targeting to only show your ads to these people.
Set your budget & bids
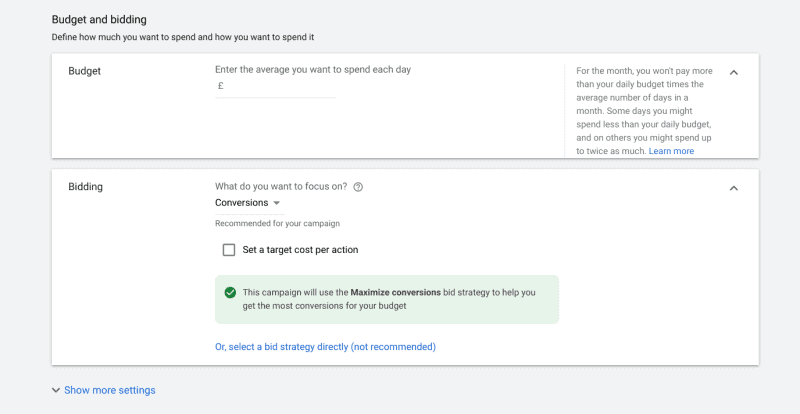
Next, set your budget for this campaign to the average amount you want to spend each day. As you can see from the explanation text below, your actual daily spend can fluctuate.
“For the month, you won’t pay more than your daily budget times the average number of days in a month. Some days you might spend less than your daily budget, and on others you might spend up to twice as much.”
In the Bidding tab, you can select which KPI you want to use as the basis for bid optimisation. You’ll stick with Conversions in most cases, but this can vary from one campaign to another.
You can also set a target cost per action (CPA), which defines how much you want to spend per conversion. This helps you ensure that you’re making enough profit from each conversion without paying more than it’s worth to hit your ROAS targets.
Choose your ad extensions
In the final section of this page, you can choose which Ad extensions you want the ads in your campaigns to use.
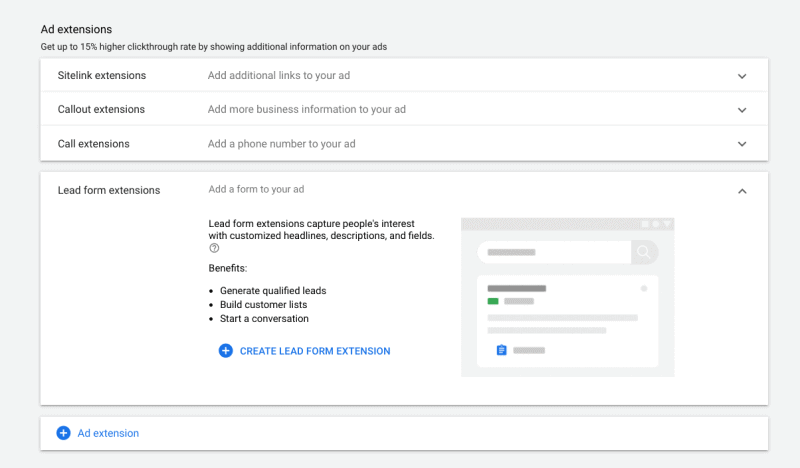
Google claims ad extensions can increase Click-Through Rates (CTRs) by up to 15%. This is because they make your ads more prominent, while also providing additional information or actions users can take.
For a summary of the ad extensions available and when to use them, have a read of our quick intro to ad extensions.
#4: Create your first ad group
Before writing your first ad, you’ll need to create an ad group. As the name suggests, they allow you to group relevant ads together within the same campaign. This is important because you can apply different settings to each ad group, so you’re not limited to applying global settings at the campaign level.
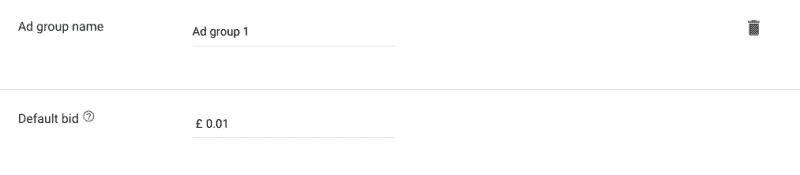
Creating an ad group is simple. All you need to do is name your ad group and set a Default bid, which is the maximum cost-per-click (max. CPC) bid for your ad group.
Next, you want to set your target keywords for your ad group. This isn’t a set-it-and-forget thing. Selecting the best combination of keywords is going to take time, and re-evaluating your keyword lists is a great way to improve performance and discover new opportunities.
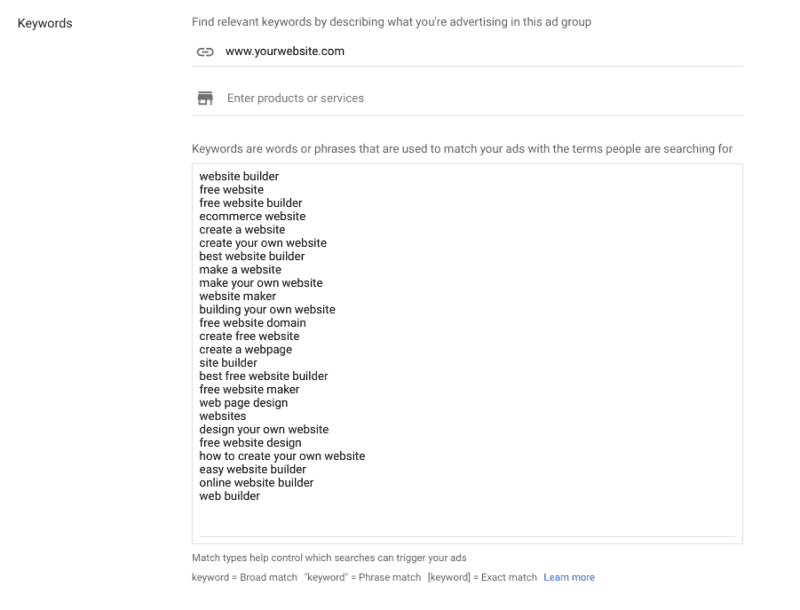
For now, we’re going to add a list of basic keywords in the Keywords tab and press the Save And Continue button to create our ad group.
#5: Create your first ad
With your ad group set up, you’re now ready to create your first ad. You’ll be taken automatically to the Create ads interface.
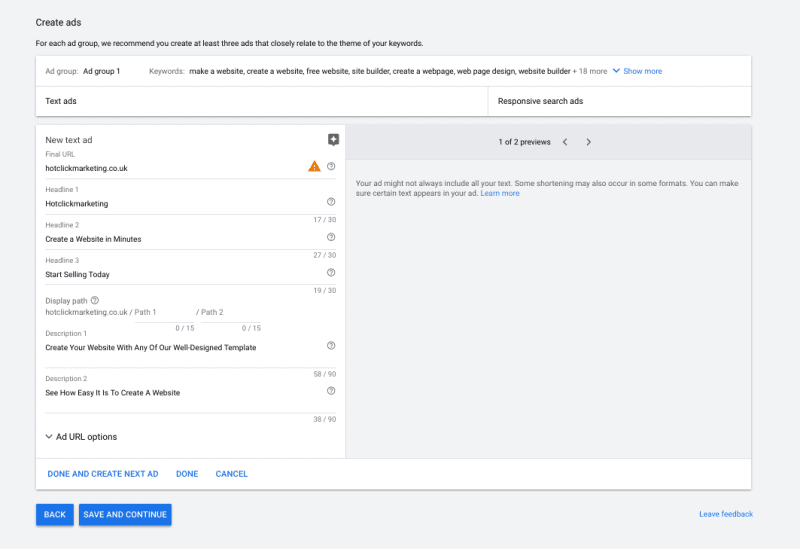
All you need to do is fill out the text fields in the ad builder. A preview of what your ad looks like will appear on the right-hand side as you go along.
Here are the steps you’ll follow:
- Define your final URL: this is the page users will land on when they click your ad
- Headline 1: This is the headline that appears at the top of your ad
- Headline 2: A secondary headline where you can include additional information, such as key selling points
- Headline 3: An optional third headline for tempting with a call to action
- Display path: This allows you to show a different URL in your ad than the page users actually land on
- Description 1: Up to 90 characters for ad copy to describe your offer
- Description 2: Space for a further 90 characters
- Add URL options: Here you can create URL options for tracking
Once you’re happy, click the Save and Continue button.
Next, it’s to the Review page. If there are any issues with your campaign or ads, Google will prompt you to address them here.

You’ll also see a summary of your campaign, including your budget and settings, as well as the number of ad groups, keywords and ads being used. Based on this, Google also provides an estimate of how many daily clicks it expects your campaign to generate.
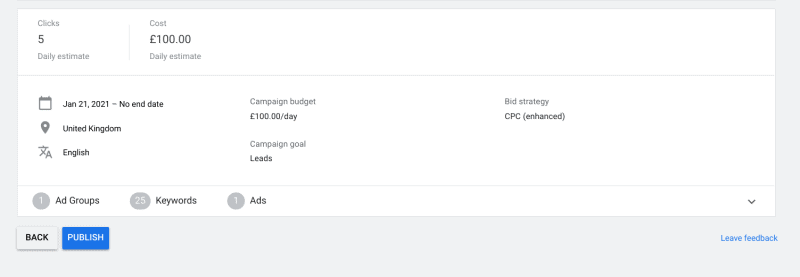
If you’re happy with how everything looks, hit the Publish button and you’ve officially created your first ad in Google Ads.
With your first campaign running in Google Ads, you should generate traffic from day one. However, you still have plenty of work to maximise the quality of traffic and converting it into leads and customers.
Many businesses run dozens or even hundreds of campaigns at once. This may include ad variations and landing page experiments to determine the best message for potential clients.
If you need any help with this, you can speak to our Google Ads experts today by calling 0161 870 2580 or reaching out to us on Twitter at @hot_click.