
How to Set Up & Install Google Analytics
Google Analytics is probably the most important marketing tool for website owners. Even the free version is one of the most capable analytics tools around, and its integration with other products like Google Ads and G Suite makes it the standard choice for online brands of all sizes.
In this guide, we show you how to set up Google Analytics (‘GA’) for a new website, one step at a time. And, once you’ve got Google Analytics all set up, we’ll show you how to install it on WordPress – the world’s most popular CMS that powers 30+% of all websites.
Here’s what you need to set up GA
To follow the steps in this article and set up Google Analytics properly, you’re going to need a few things in place:
- A website (or mobile app)
- Admin privileges for your website
- Access to the back end
- A Google Account
If you don’t have admin privileges or access to the back end of your website, you’ll want to get hold of these before setting up Google Analytics – or have the person who does to set it up on your behalf.
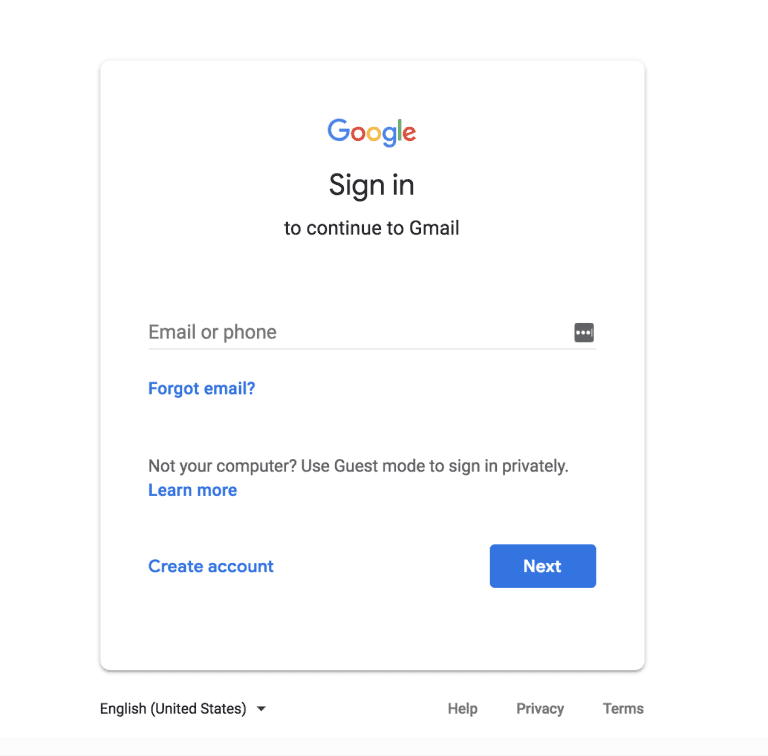
In case you don’t already have a Google Account, head to this page and follow the instructions to create one. Once that’s all taken care of, you’re ready to set up Google Analytics for your website.
Setting up Google Analytics for a new website
Setting up Google Analytics for a new website is fairly straightforward and the most technical aspect is copying and pasting a small code snippet onto your site. Even if you’re not used to handling any code, you’ll be fine as long as you follow each step in this section of our guide.
Step #1:
How to Create a Google Analytics account
First, you want to create your Google Analytics account. There are multiple places you can do this across Google platforms. Search for ‘Google Analytics’ and clicking on any of the top three results takes you to a page where you can create a new account, assuming you don’t already have one.
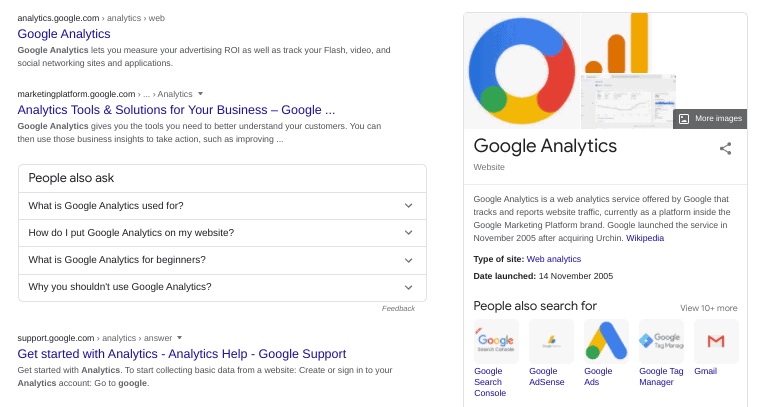
The first result on that page is the URL for Google Analytics where you can sign in or create an account. The second page is the product page for Google Analytics where you can find more information about the platform and either sign in or create an account.

Click the start Start for free button to go to the login page for Google Analytics – the same page as the first result.
Hit the Create account link at the bottom left of the form and you’ll have the options of creating either a personal or business account. Click on the To manage my business option to create your Google Account, or sign in if you already have one.
Step #2:
How to Set Up a Google Analytics Account

Now you’re signed in, it’s time to complete your Google Analytics (‘GA’) account. You should find yourself on the GA welcome page. Click on the Set up for free button to get started.
This will take you to the following Account setup page where you just need to follow the instructions:
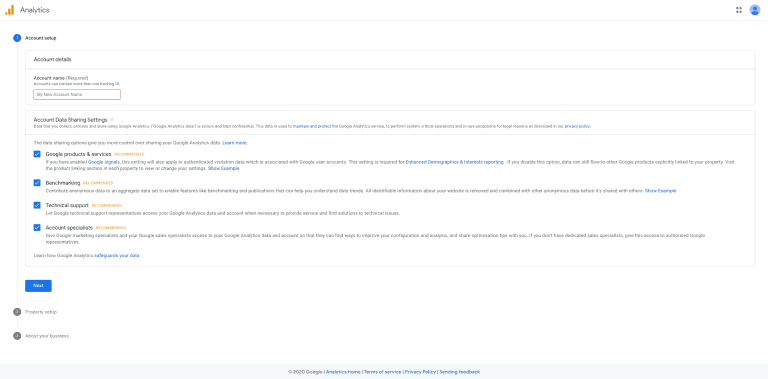
For your account name, it makes sense to use either the name of your business if you have multiple sites (you can have more than one tracking ID on the same account), or the name of your website if this is the only property you plan to use.
Once you’re done, click the Next button to provide the name of your property (ie: your website or mobile app), the time zone, and currency for your business.
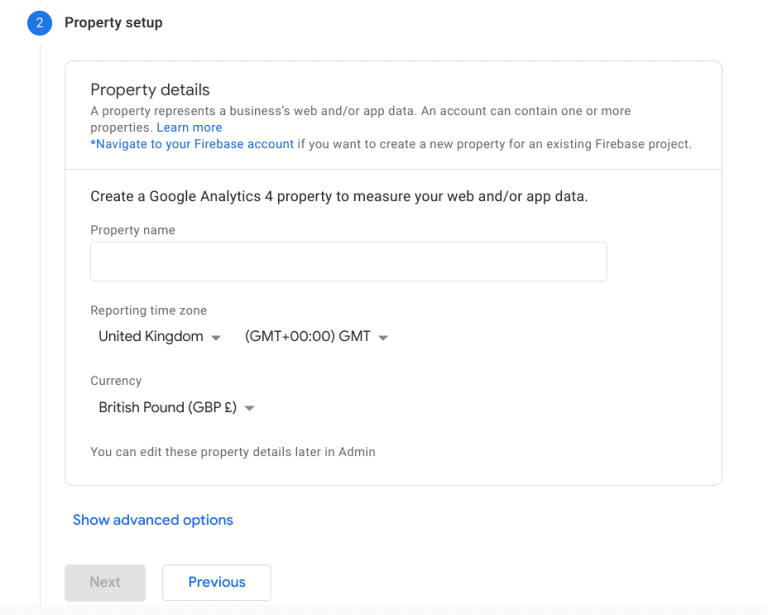
You’ll see there’s also a blue link saying Show advanced options, but you can skip right past this. It opens up the option to create a Universal Analytics property, which is part of an older version of Google Analytics and not recommended for new users.
Instead, hit the Next button where you’ll provide some basic info about your business and what you intend to use Google Analytics for.
First, you must choose the industry your business falls into. These are broad categories like ‘Internet & Telecom’ or ‘Shopping’, so you shouldn’t have any problems finding a category to fit your business.
If none of the category options seems applicable, you can select “Other” at the bottom of the dropdown list.
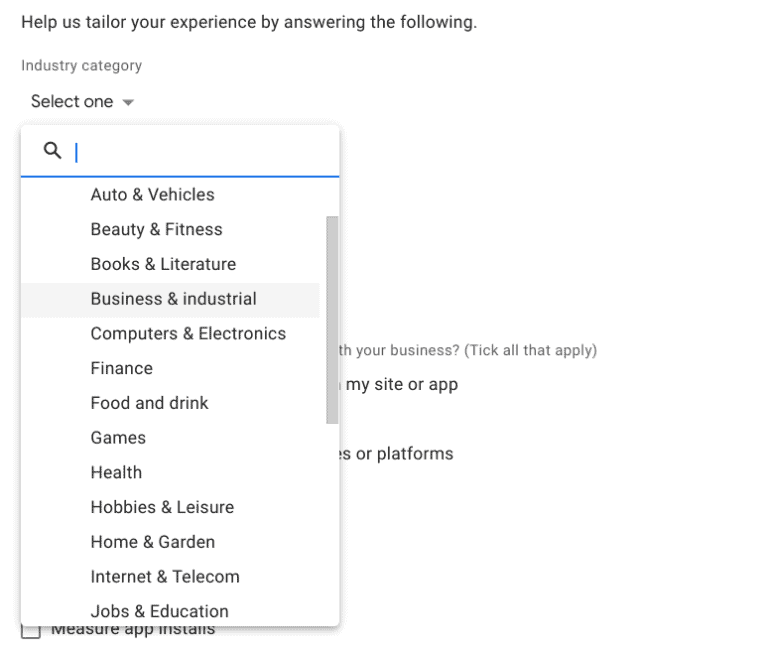
Next, you’ll state the size of your business as either Small, Medium, Large, or Very Large, depending on the number of employees you have. And, finally, you’ll need to select all the purposes you plan to use Google Analytics from the following ten options:

The purposes you select at this point depend on your objectives with Google Analytics, but don’t worry if you’re not 100% sure about your plans. At the very least, select ‘optimise my site or app experience’, and add any further purposes you think may apply to your marketing objectives.
It’s not a big deal if you select the wrong options here.
Once you’re done, hit the Create button and you’ll see a pop-up box containing the terms of service agreement.

Make sure you select the correct country/region and tick the following two check boxes:
- I also accept the Data Processing Terms as required by GDPR. Learn more
- I accept the Measurement Controller-Controller Data Protection Terms for the data that I share with Google.
Then, click the I Accept button and you’ll see a second pop-up box asking you to select your email preferences for Google Analytics tips and marketing emails from Google.

Tick the check boxes for any emails you want to receive or leave them blank before clicking the Save button. The first stage is complete. Your Google Analytics account is now live. We just need some data to analyse now.
Step #3:
How to set up a Data Stream in Google Analytics
With your Google Analytics account set up, you’ll now land on the Data Streams page, which looks like this the first time you see it:
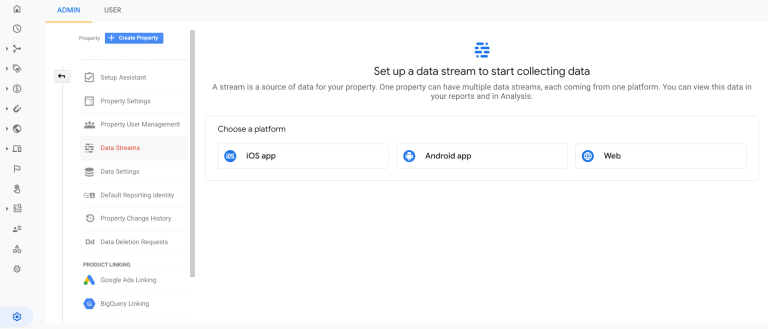
From here, we can start collecting data from your website or app. Create your first data stream by selecting the iOS app, Android app or Web button in the Choose a platform section of the interface.
For this article, we’re going to select Web. This will bring up the following form, where you can define the URL of your site and select the key measurements you want to track:

Start by typing in the URL of your site. In the next field define a name for the data stream of this site – again, this can be the name of your website.
In the Enhanced measurement section, you have the following six measurements selected by default:
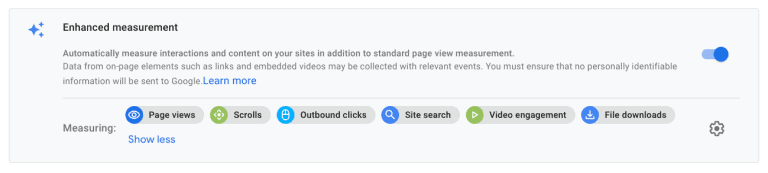
If you want to turn any of these off, you can click the setting icon at the bottom right of the panel and deselect any of the measurements you don’t want to track automatically in Google Analytics.
The only measurement you can’t turn off is page views, which is the standard measurement in Google Analytics.
Once you’re happy with your settings, click the Create Stream button and you’ll see the details page for your new stream.
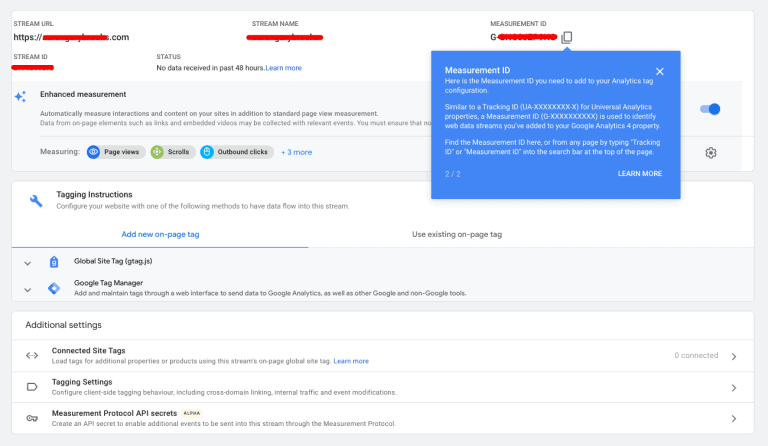
Here, you’ll find your Measurement ID and Tracking Instructions, which you’ll use to implement tracking on your website.
Step #4:
How to add Google Analytics Tags to your WordPress website
Method #1
Now that your Google Analytics account is all set up, it’s time to add your GA measurement tags to your website. There are two standard methods for doing this in the Tagging Instructions section of your stream details, as pictured above.
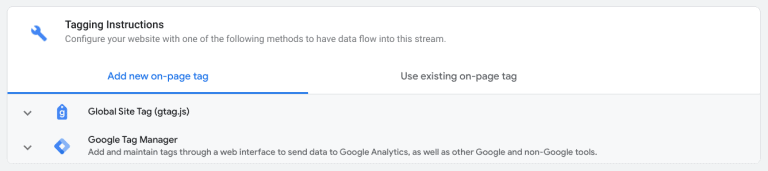
Click the copy icon at the top-right of the code snippet box to copy the code snippet to your clipboard and then paste it into the <head> section of every web page you want to measure. If your website use dynamic markup, you can add the code to your head.php file. This will add the snippet of code to every page on your domain.
Otherwise, you must paste this file into every page you want to measure. If this is the case, it’ll be worth creating a <head> template that you can use for every new page you create for this site.
Once you’ve added this code to your site, Google Analytics is set up and you’re ready to start measuring!
Method #2
How to add Google Analytics using Google Tag Manager
To install tags using Google Tag Manager, head to the official Tag Manager page on the Google Marketing Platform website. This takes you to the following page:

Click on either of the Start for free buttons and you’ll go to the Tag Manager interface to create your account.
Click on the Create Account button at the top-right of the Accounts tab to name your account, select the country you’re in (this should be correct by default) and set up your Container.
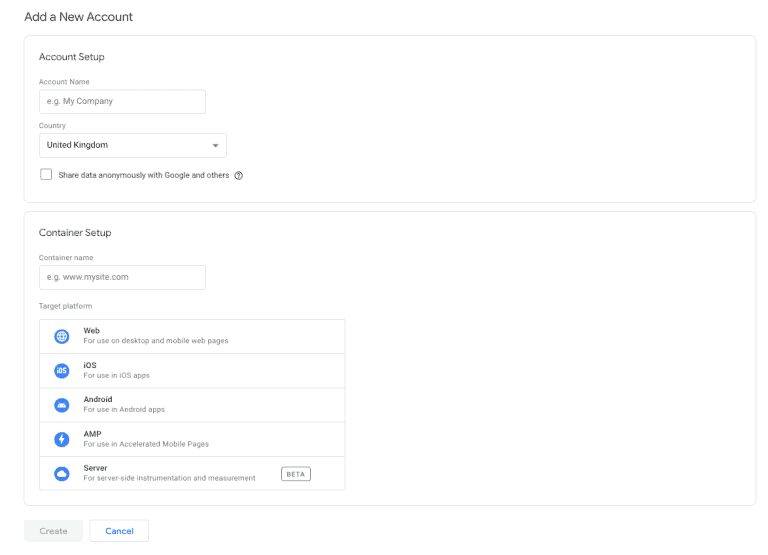
A container groups all the tags and other configurations you assign to your website (or other property) in Tag Manager. So, where it asks you to name your container, you can just type in the URL of your website, or name of whatever property you’re looking to manage tags for.
Then, select the property type you’re creating this container for – which, in our case, is a website – so you would select Web from the list of options. Next, hit the Create button and accept the terms of service agreement for using Tag Manager.
Once you’re done, you’ll have two snippets of code – one of which goes in the <head> or your site/pages and the other after the opening <body> tag of each page.
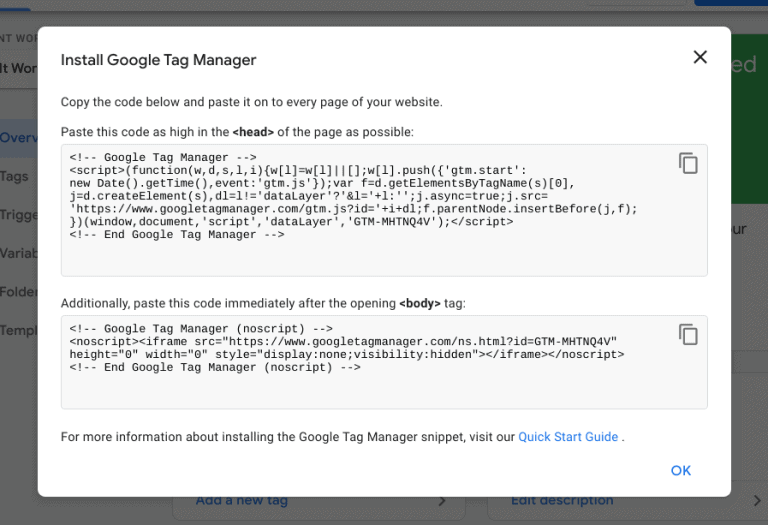
These snippets install Google Tag Manager on your website; they do not add Google Analytics tags – we’ll come to that shortly.
Again, you can click the copy tags to the right hand of each code snippet to copy them to your clipboard and then insert them in the relevant code files. To add the <body> tag across your entire site, you can place the opening <body> tag after the closing </head> tag in your global head.php file.
This will save you having to add the tag to every single page.
With Tag Manager installed on your site, you can now add your Google Analytics tag from the Tag Manager dashboard by clicking on the New Tag or Add a new tag links.
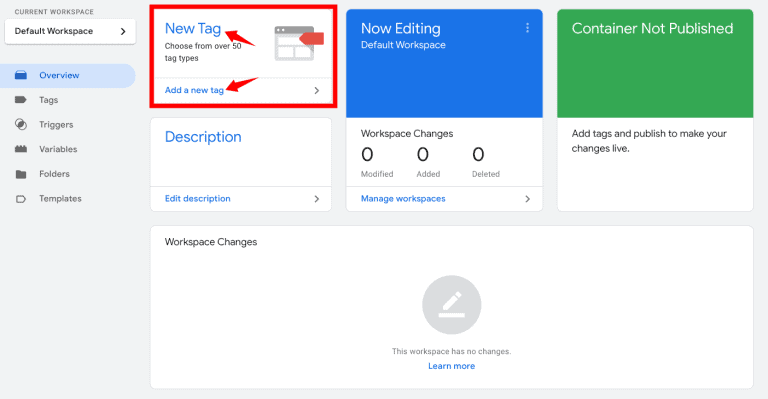
You’ll need to name your tag, but you want to be specific here because you’re using Tag Manager for the purpose of managing multiple tags. So, name your GA tag as something like [website name] Global GA Tag.
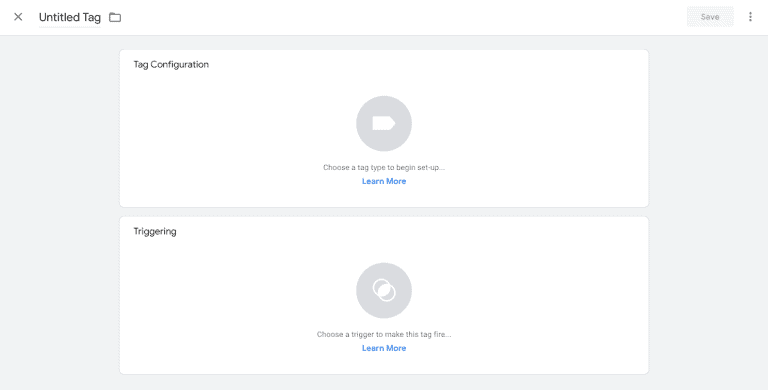
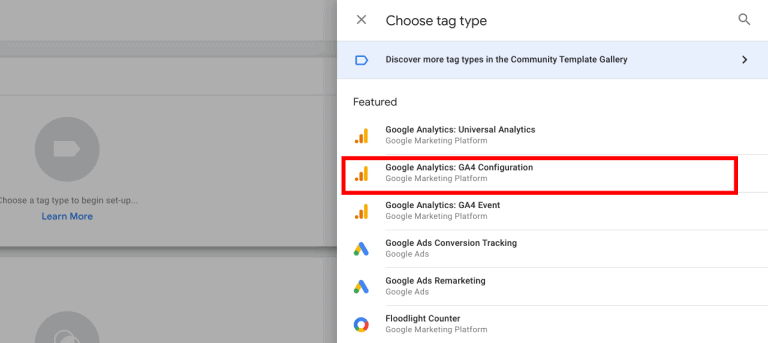
Then, click on the Tag Configuration tag and select Google Analytics: GA4 Configuration, which should be the second option from the list of featured tags.
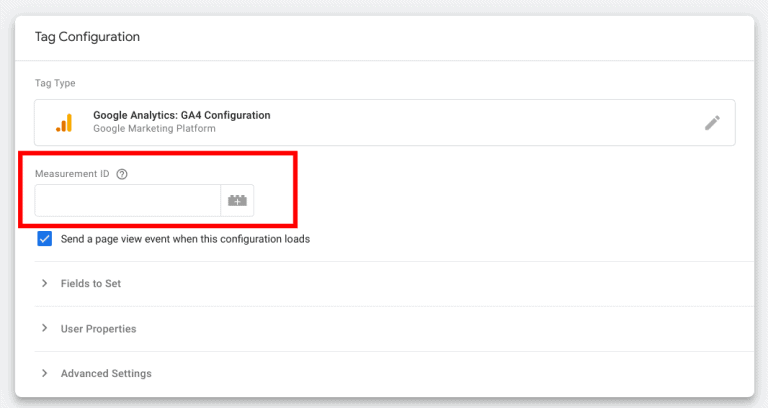
This will bring up the Tag Configuration settings for your GA tag. Head back to your Google Analytics account to grab the Measurement ID from the Web stream details page we looked at earlier.

Copy the Measurement ID for this data stream and paste it into the MEASUREMENT ID field back in the Tag Configuration section of Tag Manager.
Next, click on the Triggering tab below where you need to define the trigger event to fire off your Google Analytics tag. You’ll see that a trigger already exists for All pages to fire for every Page View and this is all you want for the standard Google Analytics measurement tag.

So, go ahead and click on that to set it as the trigger for your GA4 tag, which should leave you with the following tag settings:
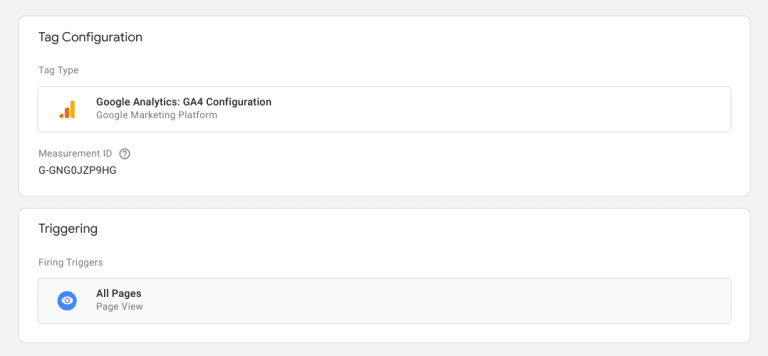
Now, click the Save button at the top-right of the interface and you’re all set.
How to Install Google Analytics on a WordPress website
If you’re running your website on WordPress, the good news is that adding Google Analytics is even easier than the methods we’ve already looked at. Again, there are several approaches you can take, but the two most common are:
- Add the Google Analytics tag to your header.php file
- Use a plugin to install Google Analytics
The first option is the cleanest approach, even if it means copying and pasting a bit of code. However, the great thing about WordPress is that it’s built using global elements, so you can add one code snippet across your entire site without needing to create a specific code structure.
Another advantage to WordPress is that there’s a plugin for just about everything you could ever need to do with your site, and there are plenty of options for installing Google Analytics.
So, let’s take a closer look at both approaches to guide you through the steps of each method.
Method #1:
Adding GA tags to your WordPress header.php file
In WordPress, the header.php file contains all the data you would normally place in the <head> tags of your website. So, this is where you’re going to place your Google Analytics tag with a simple copy and paste job.
Thanks to WordPress’ dynamic file structure, you just need to add your tag code to the header.php file of your site and this will apply to every page of your website.

To add your Google Analytics tag, log into the admin area of your WordPress site and hover over the Appearance tab in the left-hand menu column. Then, click on Theme Editor in the nested menu and then locate the header.php file in the Theme Files section of the next dashboard.

Click on the header.php and then press ctrl + f on Windows or Cmd + f on Mac to activate the search within page function in your web browser. Type in </head> and hit the return key to locate the closing </head> tag in your header.php file and then paste your Google Analytics tag code right before the closing </head> tag.
This is the easiest way to add your GA tag to the <head> section of your website but you must repeat this every time you update your theme, which isn’t ideal. The best practice for editing core WordPress files is to create a child theme (basically a copy of your theme) and edit those files instead, which maintains a hard copy of your changes and adds them on top of the theme, no matter how many times you update.
https://www.youtube.com/watch?v=coLDoM1fQcc
If you’ve never created a child theme before, you can watch the enthusiastic tutorial above from Elegant Themes for a crash course in less than five minutes.
Method #2:
Installing Google Analytics with the SiteKit Plugin
If you really don’t want to deal with any coding, the easiest way to install Google Analytics on your website is to use a plugin. Last year, Google rolled out its first official WordPress plugin, promising to connect your site with the most important Google tools – including Google Analytics.
Called Site Kit, you can install it by heading to the Plugins tab in the admin area of your WordPress site. Type ‘Site Kit’ into the search and it’ll be the first result that pops up.

Click the Install Now button and wait for the plugin to download – this should only take a few seconds. When it’s finished, click the Activate button and you’ll go back to the Plugins page of your admin area, where you’ll see the Site Kit setup prompt.
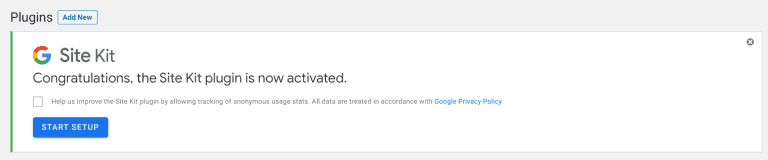
Click the START SETUP button and log in to your Google Account to approve some permissions settings. Next, you’ll be directed to the following page where you need to verify ownership of your website:
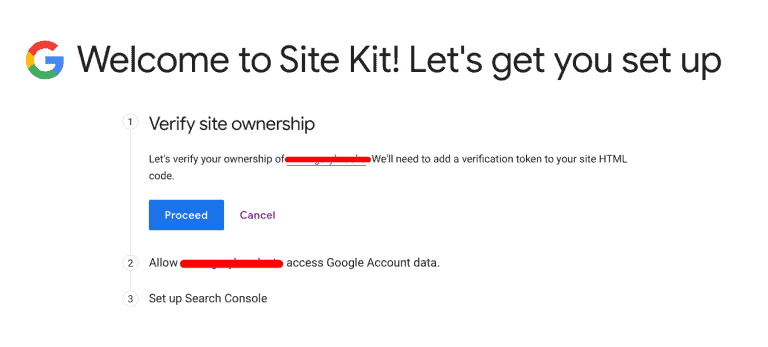
Click Proceed and then Allow in the next tab to give Site Kit access to your website data. Finally, to set up Search Console for your site, all you need to do is click through to complete the setup process.
You’ll then be sent to the Site Kit dashboard within WordPress, where you’ll see an option for Connecting Google Analytics.
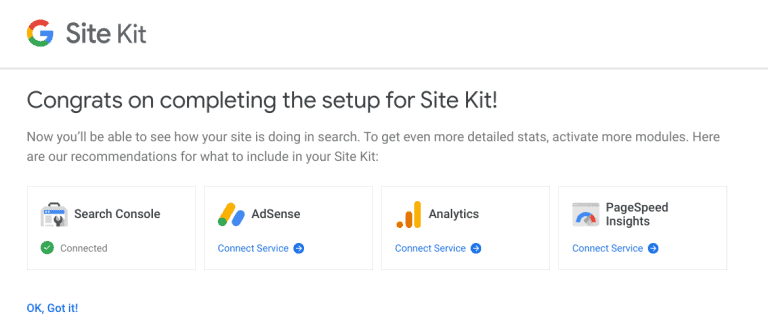
Click Connect Service under the Google Analytics option and log in to your Google Account once more to allow some additional data privileges. Once that’s all cleared, you’ll see the following page where you need to select your Google Analytics account and property (or create a new one for this site).
Fill out all the text field prompts and then click CONFIGURE ANALYTICS once you’re done. Google may ask for further permissions, depending on the measurement views you create, but this is just a case of confirming your account (again) and allowing the access requested.

Once complete, you should see the green Connected icon under Google Analytics in the Site Kit dashboard. Google will need some time to compile data for your reports, but you can sit back and relax for a while, knowing GA is ready to go on your website.
As a side note, you don’t have to use Site Kit to install Google Analytics on your WordPress website. There are plenty of other plugins that will help you do this, and some of them even have higher review scores than Google’s own plugin.
We’re recommending Site Kit as the only official Google WordPress plugin, knowing that it will continue to receive support from the search giant itself.
If you’ve followed all the options and steps in this guide but you’re still having problems with Google Analytics, call us on 0161 870 2580 for advice or technical help.
Likewise, you can reach out to us on social media or complete the form on our contact page if you have questions or would like help with your search marketing strategy.
Further reading
- PPC Essentials: What are landing pages and why are they important?
- How important is word count for SEO?
- The most important PPC stats